🛠️ Preparing to Launch Ancient Cheat
Before starting, make sure you have an Intel or AMD processor with AES support and SVM / VT-X virtualization enabled in BIOS.
1. Overlay (except Apex, ARC Raiders, Delta Force, Rust)
Download SteelSeries GG 👉 SteelSeries GG – Download
Install and launch SteelSeries GG.
Open Settings. In the GENERAL section, enable Sonar, then go to SONAR → Shortcuts and assign a convenient key (e.g. F7) to the Master - Volume Up action.
⚡ Before injecting the cheat, make sure to press the assigned key (e.g. F7) — this is required for correct operation in fullscreen mode.
For Apex, ARC Raiders, Delta Force, RUST only
Medal — does not support fullscreen mode. Download: https://medal.tv/download
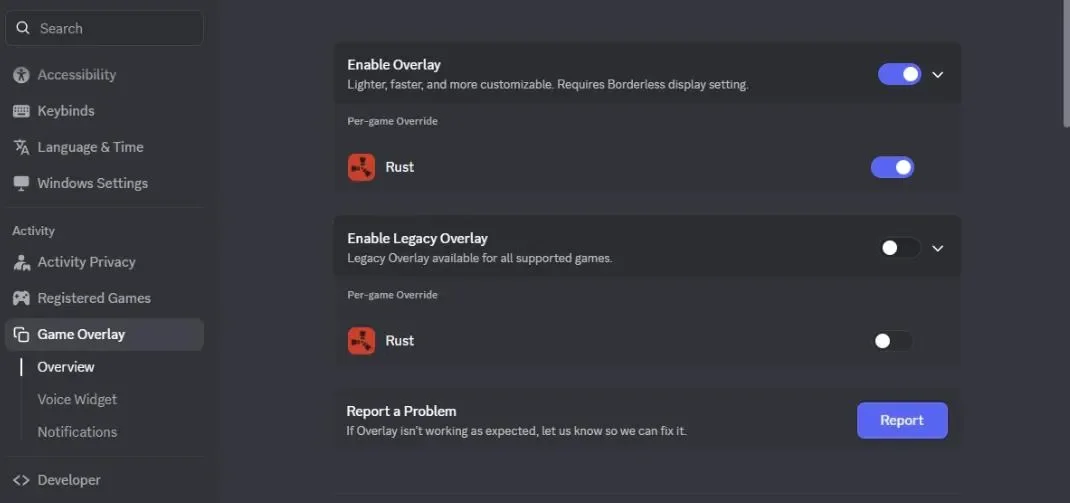
Users from Russia will need a VPN. You need to download the overlay and register an account.Discord — does not support fullscreen mode. Go to Settings → Game Overlay, enable the overlay and disable Legacy Overlay.
*If you see "No overlays available" in the current activity section — toggle the overlay off and back on again.
What it should look like:
2. System Preparation
🛡️ Disable your antivirus — it may block the cheat or delete required files.
Guide: How to Disable Windows Defender🔒 Disable TPM in BIOS — make sure it is actually disabled to avoid bans. Check TPM status in Windows: Win + R → tpm.msc
📥 Download the Loader: https://undetect.net/download/loader
🔗 Alternative link (if the site is unavailable)
3. 🚀 Launching Ancient Cheat
Run the Loader as administrator (right-click → Run as administrator) 🖱️
Enter your activation key 🔑
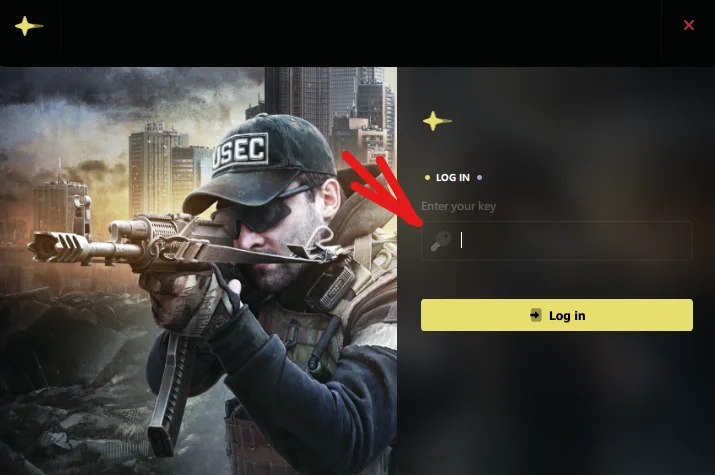
Click the Inject (Load) button.
During injection, a notification may appear: "Your computer will automatically restart in 30 seconds — 1 minute". Wait for the restart and launch the Loader again. If the notification appears again — wait for another restart.
After a successful injection, the Loader will close automatically — this means everything went well! 🎉
Launch the desired game.
The cheat menu opens with the Insert key. Use arrow keys or mouse to navigate.
If you have ANCIENT | EFT CHAMS and the menu does not appear — press F1 in-game. Everything will work after that.
4. 💻 System Requirements
Virtualization enabled in BIOS — Intel: VT-X, AMD: SVM
Windows 10 or 11 (versions 1809 – 25H2)
16 GB of RAM
For Intel processors: Hyper-V must be disabled (ARC RAIDERS only)
5. 🔄 Using the Spoofer for Delta Force and Arena Breakout
For the spoofer to work correctly, follow these steps:
Full Windows reinstallation — delete all disk partitions and create a new user.
Reinstall the game on the clean system.
Use a VPN with a clean IP — make sure the VPN is not blocked as an AezA server.
From the very first login, use VPN only!
Log into the game loader through VPN — this helps avoid bans and increases anonymity.
📝 Tips and Tricks
🖥️ Keep your GPU drivers up to date.
⚠️ Do not use the cheat on your main account — there is always a risk of a ban.
🔒 Do not download the loader from suspicious websites.
🤫 Never share your key with anyone.
🛠️ Common Errors and Solutions
1. Error
Please launch SteelSeries moment overlay (FOR GEFORCE)
Turn off and turn on the GeForce overlay again in the NVidia App settings.
2. Error
Please launch SteelSeries Sonar overlay (FOR STEELSERIES)
Before launching the cheat, press the assigned Sonar bind (e.g. F7) to activate the overlay.
3. Error
Menu flickering or black screens in game
Open SteelSeries → Settings → Moments → Capture and Sound → disable "ALLOW MOMENTS TO CAPTURE WHILE GAMING".
4. Error
Bind button not working
Try re-injecting the cheat. If that doesn't help — run the SteelSeries or NVidia App overlay as administrator.
5. Error
Menu does not appear or loader closes immediately after opening
Install the Visual C++ Redistributable library: https://aka.ms/vs/17/release/vc_redist.x64.exe
6. Error
0x296
Re-inject the cheat.
7. Error
Unknown network error
Check your internet connection. If you are using a VPN — try disabling or switching it.
8. Error
Failed to allocate memory / to map memory(x). Please reboot PC and try again.
Restart your computer. If the error persists — check startup programs and disable unnecessary ones. In internet cafes, try a different PC.
9. Error
Failed to load dependencies(x)(-x). Make sure all antiviruses are disabled.
Disable and remove all antivirus software and anti-cheats. Check your startup programs.
10. Error
Please uninstall Vanguard/Faceit first.
Uninstall Vanguard and Faceit anti-cheats from your PC and try again.
11. Error
AES instruction set is not supported.
Your processor does not support AES instructions. Unfortunately, this cannot be fixed.
12. Error
Please enable Intel VT-X/AMD-V in the BIOS.
Enter BIOS and enable the virtualization option:
Intel: "Intel Virtualization Technology" or "Intel VT-X"
AMD: "AMD-V" or "SVM mode"
13. Error
VMX/SVM is not supported.
Follow these steps:
In "Control Panel" → "Programs and Features" → "Turn Windows features on or off", disable "Virtual Machine Platform" and "Hyper-V".
Run cmd as administrator and execute the command:
bcdedit /set hypervisorlaunchtype offRestart your PC.
For Windows 11, if the issue persists — run PowerShell as administrator and execute commands to remove hvix64.exe and hvax64.exe (see full instructions in FAQ).
14. Error
Either virtual or RAID disk is present. Please revert it back to normal state.
Disable the spoofer or RAID in BIOS, then perform a full Windows reinstallation.
15. Error
Unsupported firmware.
Convert your system disk to GPT using mbr2gpt or a similar tool, then switch BIOS from Legacy mode to UEFI.
16. Error
CRD failed at XXX with code XXXXXXXX / Failed to init render.
For desktop PCs: the GPU is too old and is not supported.
For laptops: disable the integrated GPU in BIOS.
17. Error
Incorrect HWID.
Open cmd as administrator and run the following commands:
wmic diskdrive get Caption, SerialNumberwmic baseboard get SerialNumberIf the commands fail to execute — try reinstalling Windows.
18. Error
Failed to create a restore point to perform a save Hyper-V disabling. Please disable Hyper-V manually using dgreadiness tool
May also appear as: Please make sure PIN is not set in Windows sign-in options and manually disable Hyper-V using dgreadiness tool
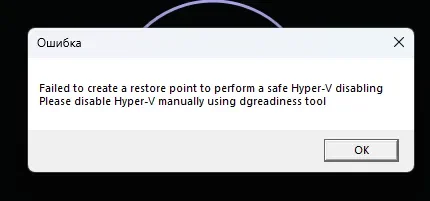
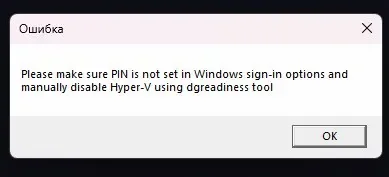
Make sure to disable Windows Hello PIN / PIN sign-in before proceeding.
To find out how — search online for: "how to disable Windows Hello PIN in Windows 10/11"
Also check the TPM and VT-D / IOMMU settings in your BIOS/UEFI:
Intel processor → check the VT-D setting
AMD processor → check the IOMMU setting
Check whether TPM is enabled
If TPM and/or VT-D / IOMMU are enabled — they must be disabled in BIOS/UEFI. Setting names may vary depending on your motherboard or laptop manufacturer — search online using your device model if needed.
Disabling Device Guard / Credential Guard via DG Readiness Tool
1. Download the tool from Microsoft
https://www.microsoft.com/en-us/download/details.aspx?id=53337
This is the official Microsoft Device Guard and Credential Guard hardware readiness tool.
2. Extract the ZIP file
Extract the archive to a convenient folder, for example:
C:\Users\YourUsername\Downloads\DG_Readiness_Tool_v3.63. Open PowerShell as administrator
Click Start, type PowerShell, right-click Windows PowerShell and select Run as administrator. Click Yes if a UAC prompt appears.
4. Navigate to the tool folder
Copy the path from the Explorer address bar and run in PowerShell:
cd "C:\Users\YourUsername\Downloads\DG_Readiness_Tool_v3.6"Always use quotes around the path — especially if the folder name or username contains spaces.
5. Allow script execution
Set-ExecutionPolicy -Scope Process -ExecutionPolicy BypassWhen prompted, press A (Yes to All) and then Enter. This permission only applies to the current PowerShell window.
6. Run the tool
.\DG_Readiness_Tool_v3.6.ps1 -DisableAlways include .\ at the beginning of the command — without it the command may not execute.
7. Wait for completion
Do not close PowerShell until the tool finishes. If confirmation prompts appear — confirm actions related to disabling Device Guard / Credential Guard.
8. Restart your computer
Via the Start menu or with the command:
shutdown /r /t 09. Post-restart confirmation
If a black screen with a confirmation prompt appears — press F3 and follow the on-screen instructions.
PowerShell was run as administrator
You navigated to the tool folder using the cd command
The path copied points to the folder containing the .ps1 file
You selected "Yes to All" (key A) after the Set-ExecutionPolicy command
The .ps1 file name is specified exactly
The command starts with .\
TPM and VT-D / IOMMU are disabled in BIOS/UEFI
Windows Hello PIN was disabled before following the instructions
19. Error
Failed to map memory (0)
Download Autoruns from the official Microsoft Sysinternals website:
https://learn.microsoft.com/ru-ru/sysinternals/downloads/autoruns
After launching the program, review the startup entries and disable unnecessary ones.
Pay attention to entries highlighted in red — but only remove them after careful review, to avoid disabling important system components or required programs.
💡 General Recommendations
Run the overlay and cheat as administrator.
Disable all antivirus software and anti-cheats before launching.
If you have issues with SteelSeries GG — remove your VPN, restart your PC and reinstall SteelSeries GG.
If you have issues with SteelSeries Sonar — close all Sonar processes via Task Manager and relaunch with administrator privileges.
If the cheat menu does not appear — re-inject and make sure all system libraries are installed.