
🔄 Windows Reinstallation
How to reinstall Windows:
Reinstalling Windows will result in data loss
📥 ISO Installation
Download Media Creation Tool from the link above — click the Download button
Open Media Creation Tool
Select option:
Create installation media (USB flash drive, DVD, or ISO file) for another PC
Keep the recommended settings by default
Select "ISO file"
Specify a folder to save the ISO
When the ISO is ready — download Rufus
https://github.com/pbatard/rufus/releases/download/v4.5/rufus-4.5.exe/
Open Rufus and select the following parameters
Click "Select" and navigate to the directory where you saved the ISO
Device – select your USB flash drive (8 GB or larger)
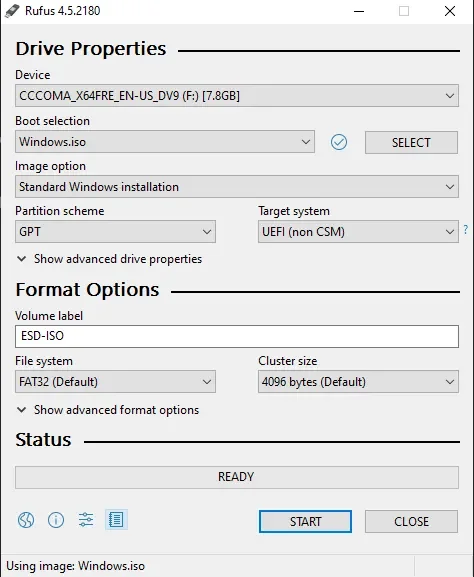
Select the last two parameters
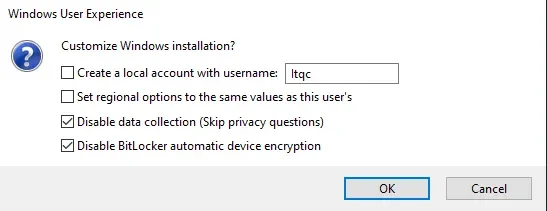
Click OK and wait for Rufus to finish formatting the USB flash drive
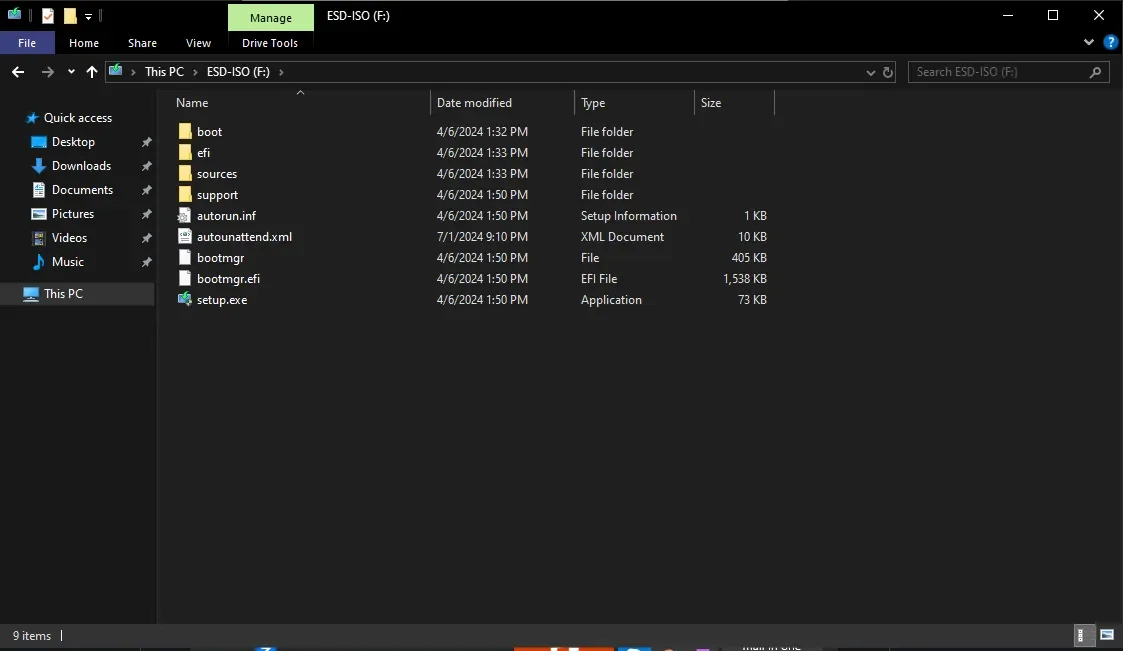
✅ Your USB flash drive should look like this:
Before continuing, if you use Wi-Fi — be sure to download Wi-Fi drivers to the flash drive. Drivers can be downloaded from your motherboard manufacturer's website.
To find your motherboard model — press Win + R, type msinfo32, and find it in the window that opens.

Hold SHIFT and click "Restart"
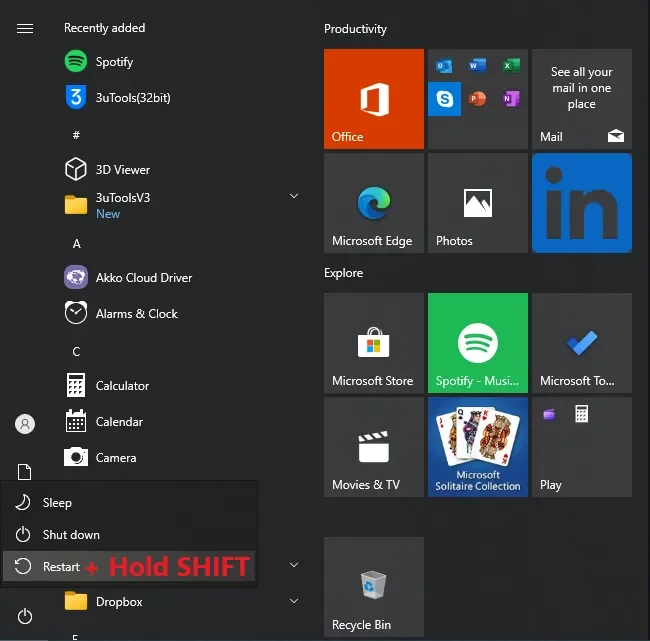
Select "Use a device" and specify your flash drive
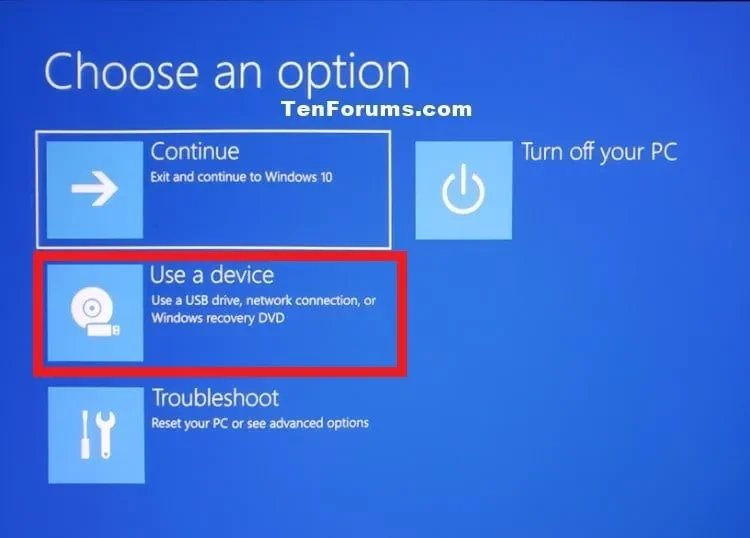
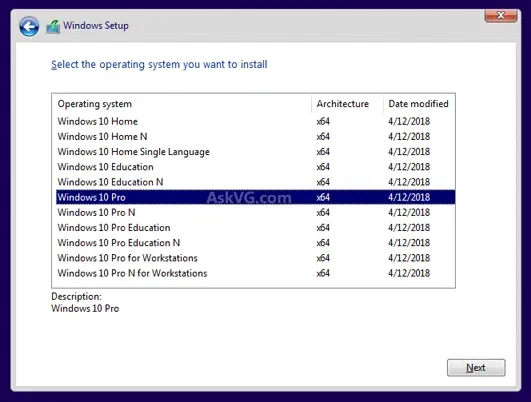
Select Windows 10 Pro
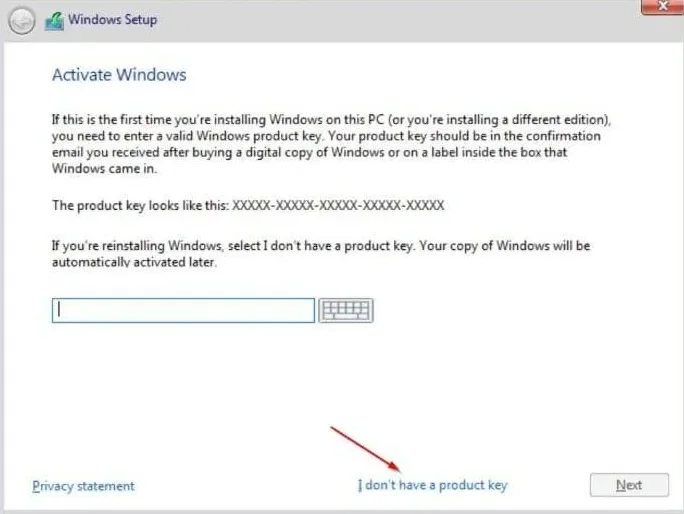
Select "I don't have a product key" (if this doesn't appear — don't worry)
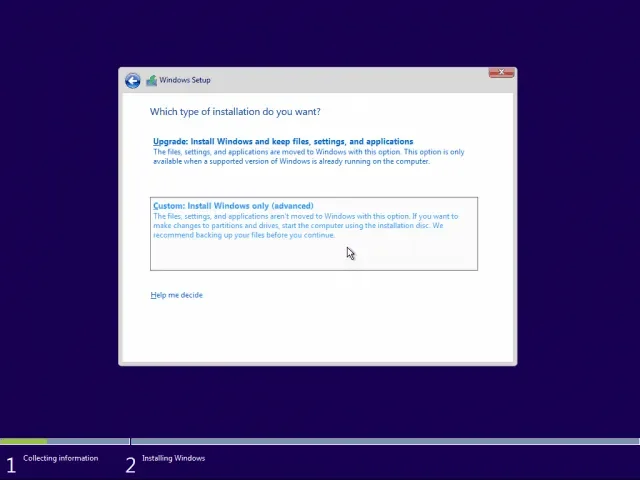
Select "Custom: Install Windows only (advanced)"
Press SHIFT + F10
Type diskpart in the command prompt
Type select disk # (where # is the number of each disk) and clean for each disk except the flash drive
Your flash drive is most likely the last disk in the list (DO NOT DELETE IT)
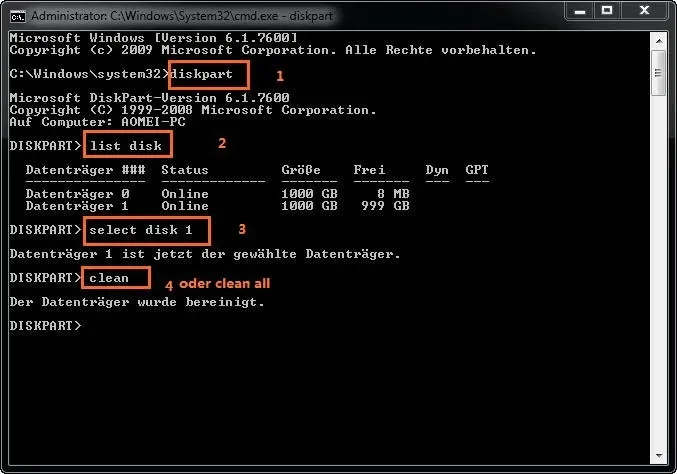
Close the command prompt and click "Refresh"
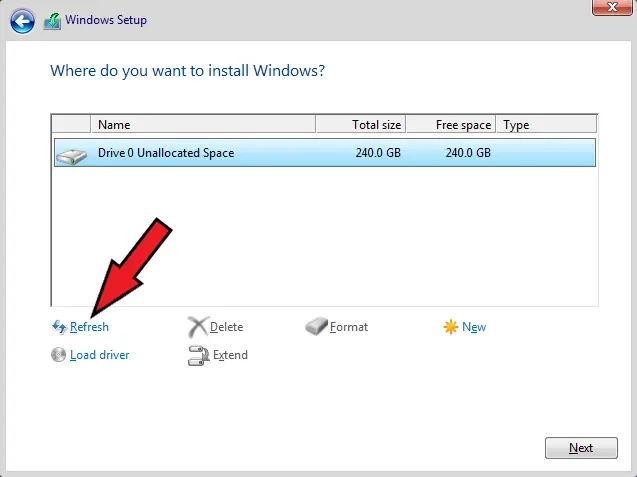
Select the main drive and click "Next"
The installation process will begin
⚙️ Windows Setup
How to set up Windows
Follow these steps exactly (do not connect to the internet until you finish setup)
SETUP VIDEO - https://streamable.com/8w2pxa
DO NOT sign in to a Microsoft account (example)
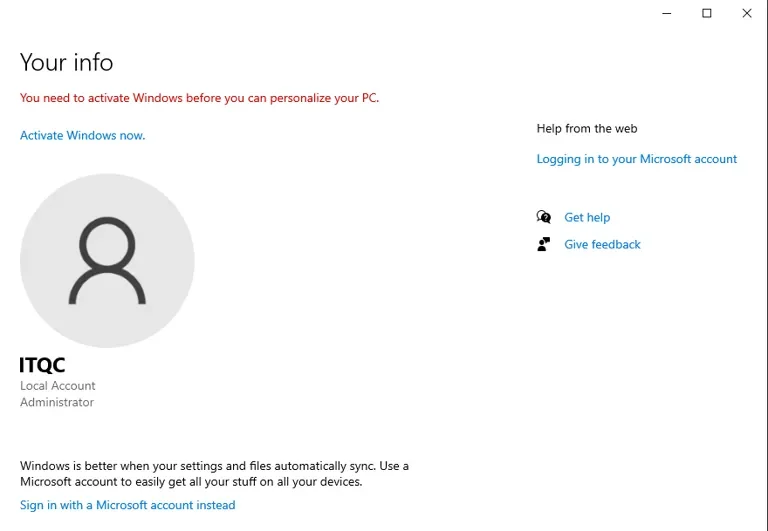
📦 Setup
https://mega.nz/folder/l2sj2Iya#UMIxvMikeJuS3YHjV4cPDQ
All necessary programs mentioned in the guide, as well as the loader itself, are already inside Mureh Installer. Download Mureh Installer from the link above, create a folder on your desktop (use only English/Latin letters) and move Mureh Installer there. Everything is ready — just follow the instructions and download the necessary programs through Mureh Installer.
https://www.techpowerup.com/download/visual-c-redistributable-runtime-package-all-in-one/?amp=
Before opening Mureh Installer, download and run the install_all.bat file as administrator, then restart your computer.
🛡️ Disable Windows Defender
How to disable Windows Defender:
Disabling Windows Defender manually:
Click "Start" and type "Windows Security"
Open the "Windows Security" app from search results, go to "Virus & threat protection". In the "Virus & threat protection settings" section, select "Manage settings"
Turn off "Real-time protection"
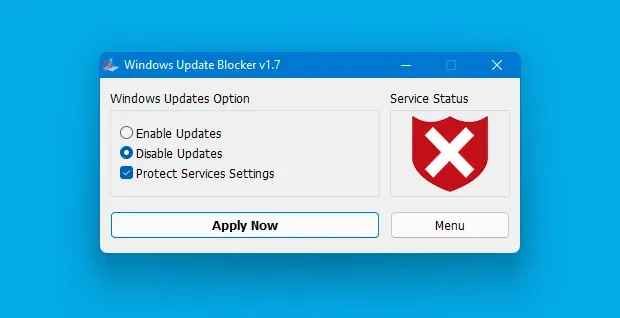
🚫 Disable Windows Updates
Open Mureh Installer
Download Wub
Extract the files
Run Wub_x64.exe
Disable Windows updates and click "Apply"
🔧 BIOS Flashing
This is a mandatory guide, do not skip!
HOW TO FLASH YOUR BIOS:
Incorrect BIOS flashing can damage your system. Proceed at your own risk. Make sure you have the correct BIOS version and stable power. Contact support if you need help!
Identifying motherboard model and system information
Open "System Information" (type msinfo32 in search)
Find the fields BaseBoard Product and BaseBoard Manufacturer (Motherboard model and manufacturer)
Remember or write down BIOS Version/Date (BIOS version and date)
If the information in the system is inaccurate or causes doubt — go to UEFI/BIOS settings and check the data manually.
INSTRUCTIONS FOR EACH MOTHERBOARD
First download and run this tool, select OPTION 1 or 2 (follow the loader instructions) — [MANDATORY]
Make sure you downloaded a different BIOS version (preferably one version below the current one)
Format the flash drive to FAT32 (Right-click flash drive → Format → select FAT32 in "File system") If FAT32 is unavailable — use this tool: CLICK HERE
Flash the BIOS twice — this is very important! You don't need two different versions — just repeat flashing the same version twice
ASUS Instructions - https://streamable.com/5bgtkf
MSI Instructions - https://streamable.com/i8xgwh
GIGABYTE Instructions - https://streamable.com/nz6yv7
ASROCK Instructions - https://www.youtube.com/watch?v=dUCWRqOdLUw
⚙️ UEFI Settings Configuration
After flashing BIOS, enter BIOS, open Advanced Mode and set these settings exactly 1:1 — DO NOT SKIP A SINGLE STEP!
🔵 INTEL CPU's
Don't even think about skipping a single item — they are 100% important.
ASUS:
Virtualization: - Advanced → CPU Configuration → Intel (VMX) Virtualization Technology set to Disabled.
TPM: - Advanced → PCH-FW → TPM Device Solution set to Enable Discrete Firmware/TPM. - Advanced → Trusted Computing → Security Device Support set to Disabled.
Armoury Crate: - Tool → ASUS Armoury Crate → Download & Install ARMOURY CRATE app set to Disabled.
Fast Boot: - Boot → Boot Configuration → Fast Boot set to Disabled.
Secure Boot: - Boot → Secure Boot → OS Type set to Other OS.
MSI:
Virtualization: - OC → CPU Features → Intel Virtualization Tech set to Disabled.
TPM: - Settings → Security → Trusted Computing → TPM Device Selection set to dTPM. - Settings → Security → Trusted Computing → Security Device Support set to Disabled.
MSI Driver Utility Installer: - Settings → Advanced → MSI Driver Utility Installer set to Disabled.
Fast Boot: - Settings → Boot → Fast Boot set to Disabled.
Secure Boot: - Settings → Security → Secure Boot → Secure Boot set to Disabled.
GIGABYTE:
Virtualization: - Tweaker → Advanced CPU Configuration → Intel (VMX Virtualization Technology set to Disabled.
TPM: - Settings → Miscellaneous → Intel Platform Trust Technology (PTT) set to Disabled. - Settings → Miscellaneous → Trusted Computing → Security Device Support set to Disabled.
Gigabyte Utilities Downloader Configuration: - Settings → IO Ports → Gigabyte Utilities Downloader Configuration → Download & Install app set to Disabled.
Fast Boot: - Boot → Fast Boot set to Disabled.
Secure Boot: - Boot → Secure Boot → Secure Boot Enable set to Disabled.
UEFI/BIOS PARAMETERS TO DISABLE:
SVM Mode
TPM
Utility Installer
Fast Boot.
Secure Boot
✅ Save changes and exit BIOS (F10 — "Save and Exit").
🔴 AMD CPU's
Don't even think about skipping a single item — they are 100% important.
ASUS:
Virtualization: - Advanced → CPU Configuration → SVM Mode set to Disabled.
AMD NX Mode: - Advanced → CPU Configuration → NX Mode set to Enabled.
TPM: - Advanced → AMD fTPM → TPM Device Solution set to Enable Discrete Firmware/TPM. - Advanced → Trusted Computing → Security Device Support set to Disabled.
Armoury Crate: - Tool → ASUS Armoury Crate → Download & Install ARMOURY CRATE app set to Disabled.
Fast Boot: - Boot → Boot Configuration → Fast Boot set to Disabled.
Secure Boot: - Boot → Secure Boot → OS Type set to Other OS.
MSI:
Virtualization: - OC → Advanced CPU Configuration → SVM Mode set to Disabled.
NX Mode: - OC → Advanced CPU Configuration → NX Mode set to Enabled.
TPM: - Settings → Security → Trusted Computing → AMD fTPM Switch set to AMD CPU fTPM Disabled. - Settings → Security → Trusted Computing → Security Device Support set to Disabled.
MSI Driver Utility Installer: - Settings → Advanced → MSI Driver Utility Installer set to Disabled.
Fast Boot: - Settings → Boot → Fast Boot set to Disabled.
Secure Boot: - Settings → Security → Secure Boot → Secure Boot set to Disabled.
GIGABYTE:
Virtualization: - Tweaker → Advanced CPU Configuration → SVM Mode set to Disabled.
AMD NX Mode: - Tweaker → CPU Configuration → NX Mode set to Enabled.
TPM: - Settings → Miscellaneous → Trusted Platform Module set to Disabled. - Settings → Miscellaneous → Trusted Computing → Security Device Support set to Disabled.
Gigabyte Utilities Downloader Configuration: - Settings → IO Ports → Gigabyte Utilities Downloader Configuration → Gigabyte Utilities Downloader set to Disabled.
Fast Boot: - Boot → Fast Boot set to Disabled.
Secure Boot: - Boot → Secure Boot → Secure Boot Enable set to Disabled.
UEFI/BIOS PARAMETERS TO DISABLE:
SVM Mode
TPM
Utility Installer
Fast Boot.
Secure Boot
✅ Save changes and exit BIOS (F10 — "Save and Exit").
📥 Download Loader
Download Visual C++ Redistributable Runtimes All-In-One
Open Mureh Installer
Download Visual C++ Runtimes
Extract the archive
Run install_all.bat as administrator
Restart PC
📥 Download DirectX Runtimes
Open Mureh Installer
Download DirectX
Uncheck "Install the Bing Bar"
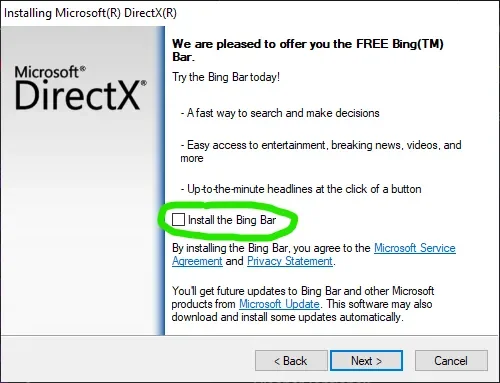
Click "Next" until installation is complete
📥 Download Loader
Follow the link and activate the key: https://activatekey.xyz/login.php
Open Mureh Installer
Select PermSpoofer
Extract PermSpoofer to your desktop
🎭 Spoof
🔑 Serial Numbers
Download (via Mureh Installer) and open Mureh Checker.exe, copy everything to a document and save
Do these actions before Spoof and after Spoof, then compare your Serial Numbers
🎭 HWID Spoof
To spoof for Valorant & LoL (Vanguard) go to the section below: HWID Spoof Vanguard
Launch Loader
Enter your key (check the box «Remember me»)
Log in to the system
Disable Ethernet Spoof - recommended, another method will spoof
Disable / Enable GPU Spoof - usually not required but for games like Apex Legends, Rust may be needed
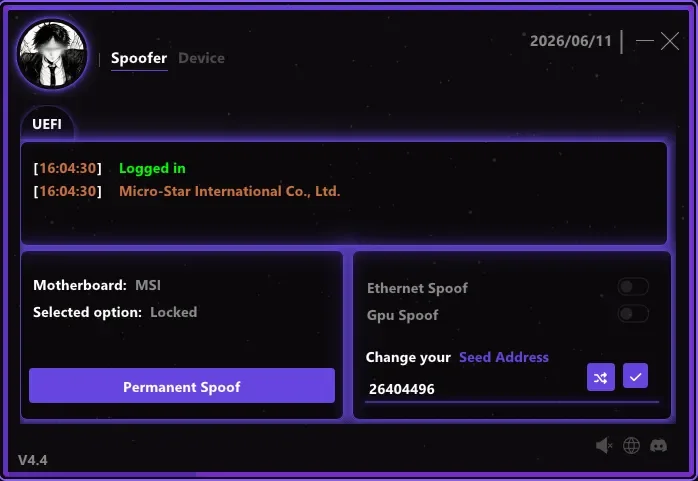
Spoofing
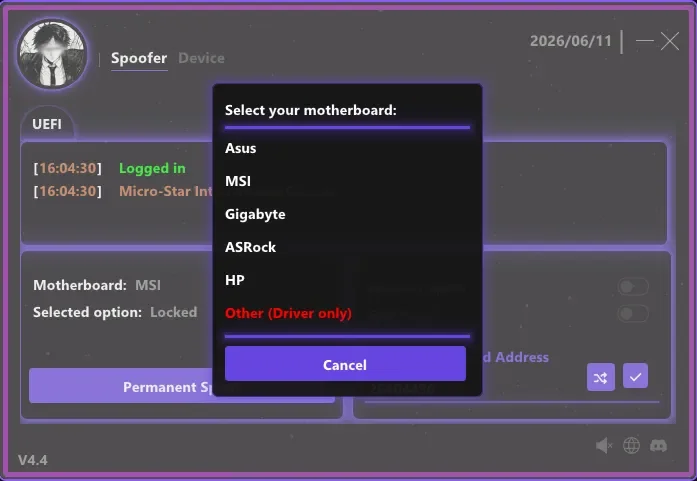
Click Permanent Spoof.
A popup window will appear — click Other (Driver Only).
When you see the green message "Spoofed", restart your PC.
Open Checker and compare serial numbers
Now go to the After Spoof section
🛡️ HWID Spoof Vanguard
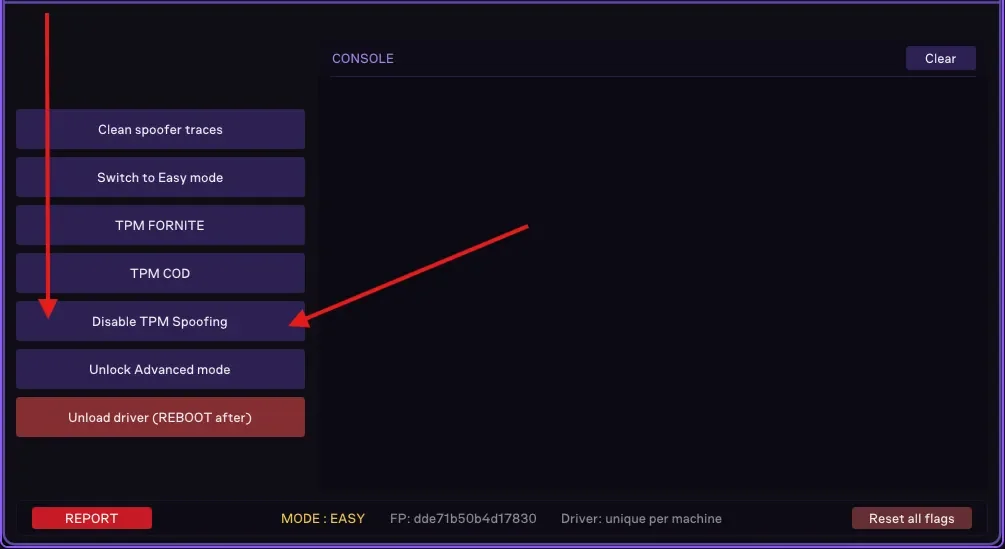
DISABLE TPM DRIVER
Since Vanguard requires fTPM, you can disable the TPM driver.
Open Debug.exe.
Click Disable TPM Spoofing.
Launch Loader
Enter your key (check the box «Remember me»)
Log in to the system
Disable Ethernet Spoof - recommended, another method will spoof
Disable / Enable GPU Spoof - usually not required but for games like Apex Legends, Rust may be needed
Spoofing
Click Permanent Spoof.
A popup window will appear — click Other (Driver Only).
When you see the green message "Spoofed", restart your PC.
Open Checker and compare serial numbers
Now go to the After Spoof section
⚙️ HWID Spoof (if drives didn't spoof)
Use this spoof method only if drives or some other serial numbers didn't spoof. Before using this method, you should unload the spoofer driver (last item in the instructions). It is also recommended to contact Technical Support before using this method.
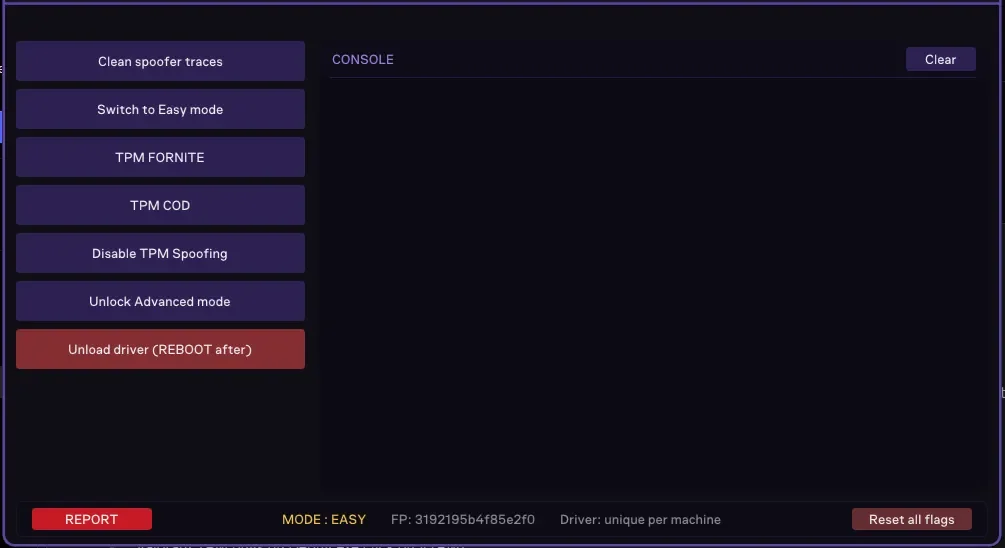
Open Debug.exe and click Unlock Advanced mode
Launch Loader
Enter your key (check the box «Remember me»)
Log in to the system
Disable Ethernet Spoof - recommended, another method will spoof
Disable / Enable GPU Spoof - usually not required but for games like Apex Legends, Rust may be needed
UEFI
Click Driver Spoof
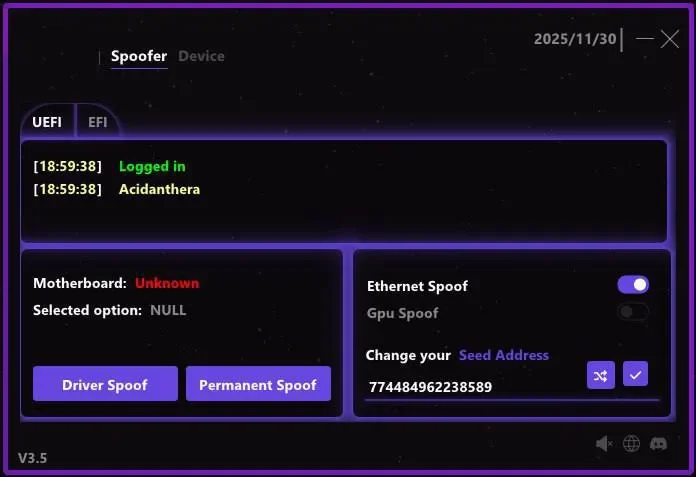
Select your motherboard and click "Spoof".
Restart PC
Open Checker and compare serial numbers
Now go to the After Spoof section
✅ After Spoof
What to do after device spoofing
After you have completed spoofing and verified that your serial numbers have changed, launch Debug.exe:
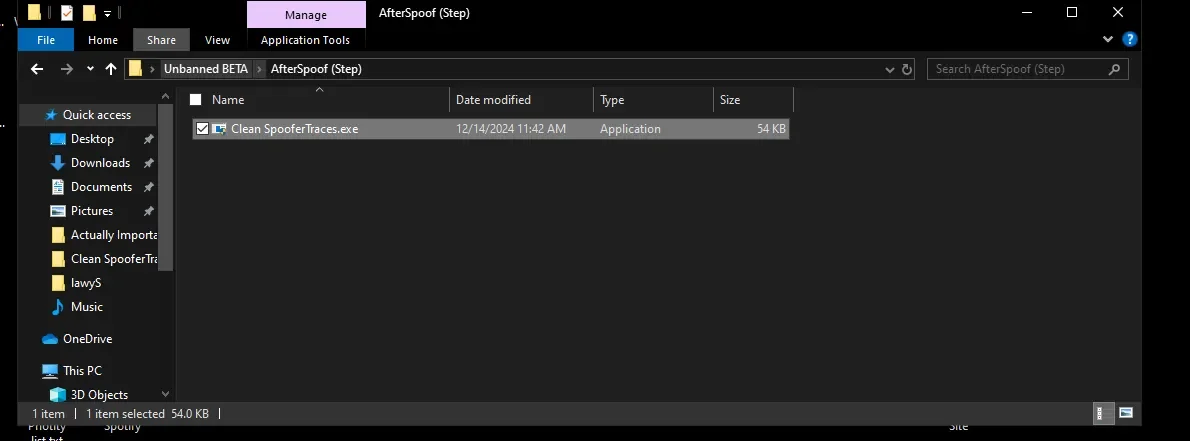
Click the Clean spoofer traces button. This will remove the loader and spoofer cache.
When finished, delete Debug.exe.
DO NOT log into third-party programs that require login (Logitech G HUB, GeForce Experience, Razer, Medal, Microsoft, OneDrive, SteelSeries).
Use a VPN for 10–14 days after spoofing. AdGuard VPN, WireGuard, or IP Vanish recommended. (Only for Game: Fortnite)
DO NOT log into an account that received a 24-hour ban or VPN kick — always use a new account (for example, in Fortnite).
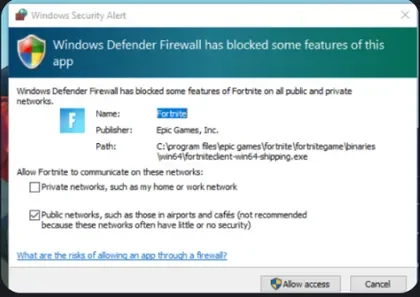
🗑️ Unload Driver
How to unload the spoofer driver without reinstalling Windows
If you get this error when trying to spoof again, you need to unload the driver.
THIS WILL REMOVE THE SPOOFER FROM YOUR PC AND RESTORE ORIGINAL SERIAL NUMBERS
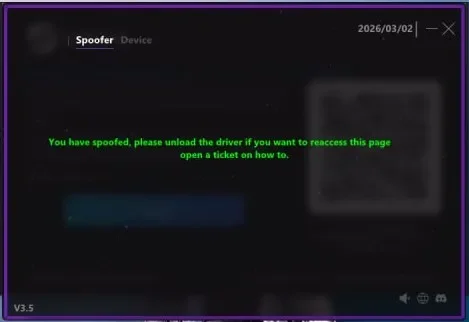
Open Debug.exe and click Unload Driver.
After that, restart your computer — done.