
EU Version
Step-by-Step Guide: Setup and Use of a Loader for Rust
1️⃣ Remove All Antivirus Programs:
🛠 Open Control Panel.📂 Go to Programs and Features.❌ Find installed antivirus programs, select them, and click Uninstall.
2️⃣ Completely Disable Windows Defender:
⚙ Open Settings (press Win + I).🔄 Go to Update & Security.🛡 Select Windows Security → Virus & threat protection.⚠ Under “Virus & threat protection settings,” click Manage settings.🚫 Turn off all toggles.
3️⃣ Disable Core Isolation:
⚙ Open Settings (press Win + I).🔄 Go to Update & Security.🖥 Select Windows Security → Device security.🔧 Click Core isolation and disable all features.
📥 Step 1: Downloading and Configuring the Loader
⚠ IMPORTANT: THERE MUST BE NO PASSWORD (PIN) SET ON YOUR COMPUTER!
1️⃣ Download the loader from the developer’s website:
https://disk.yandex.ru/d/iqHU8jmNHZFegw
Password: kali
ATTENTION! THE LOADER IS ACTIVE FOR ONLY 5 MINUTES!
2️⃣ Running DisableSystemMitigations.reg:
🖱 Right-click on the file "DisableSystemMitigations.reg."🔗 Click “Merge.”🔄 Restart your computer.
💾 Step 2: Running the Loader from a USB Drive
1️⃣ Copy the loader to a USB flash drive.
2️⃣ Run the loader only from the USB drive.
❌ If the program is not running from the USB, an error will appear and the process will stop.✅ If the loader starts correctly, you will see a notification asking you to remove the USB drive.3️⃣ Remove the USB drive and click "OK."4️⃣ After removing the USB, the loader will continue working.
💡 Important: If the loader does not start, make sure it was copied to the USB before running!
🔄 Step 3: Completing Installation
1️⃣ First loader launch:
🔄 The computer will reboot into Safe Mode.🖱 After rebooting, run the loader again.🔙 The computer will switch back to normal mode.🎮 Open Steam and log in to the account you want to play on.🖱 Run the loader again and wait for the files to load.🔑 Enter your activation key and wait for a Windows tray notification confirming successful loading.
🛠 Step 4: Using Loader Functions
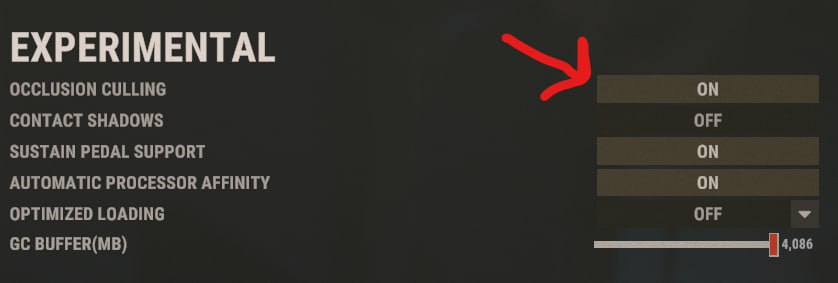
IMPORTANT!
IT IS NECESSARY TO INCLUDE THE 'OCCLUSION CULLING' FUNCTION IN THE GAME IN THE 'EXPERIMENTAL' SECTION
1️⃣ Console Commands:
⌨ Open the Rust game console (press F1).💻 Enter the following commands:🔍 Enable ESP: culling.debug 1⚙ Adjust ESP smoothness: culling.entityupdaterate 244🎥 Bind debug camera: bind [key] debug.debugcamera🌞 Enable eternal day: admintime 12🌧 Disable rain: adminrain 0🌫 Disable fog: adminfog 0
2️⃣ Tools Tab:
🛠 In the console, the Tools tab is available, where you can enable or disable various in-game objects, for example:🏗 Constructions🌿 Grass🌲 Trees
Additional Information
🚀 The loader will not start without a USB drive!❗ If you see an error message when launching, make sure the program was run from the USB.💾 After the first launch, the USB must be removed, otherwise the program will not continue.⚙ If the loader does not load in Safe Mode, check BIOS settings and disable Secure Boot.