Secure Boot is a UEFI feature responsible for Windows boot security. It checks whether the bootloader, drivers, and system components can be trusted. Sometimes it needs to be temporarily disabled: for example, when configuring the system, installing certain drivers, working with non-standard software, or fixing boot errors. Below is a clear guide on how to check the status of Secure Boot, how to disable Secure Boot in BIOS on ASUS, Gigabyte, and MSI, and how to enable it again without unnecessary risks. ⚡
What Is Secure Boot and Why Disable It?
Secure Boot is a UEFI setting that controls the computer startup process before Windows loads. The feature checks the digital signatures of the bootloader, drivers, and important system files. If a component fails verification, the device may block it from launching.
The main purpose of Secure Boot is to improve system security and protect the computer from malicious bootloaders, rootkits, and unauthorized interference with the startup process. Under normal conditions, it is better to keep this feature enabled.
Disabling Secure Boot may be necessary if the system prevents you from installing a required driver, running technical software, using an alternative OS, or changing boot parameters. Before changing the settings, it is important to understand how to restore everything back.

Disabling Secure Boot reduces protection during the system startup stage. Change this parameter only when truly necessary and check the current BIOS mode beforehand.
How the Security Mode Works and Why It Blocks Third-Party Software
When you turn on the computer, UEFI takes control before Windows starts. At this stage, Secure Boot checks whether the bootloader and drivers are included in the trusted list. If there is no signature or it does not match the keys, the system blocks the component from launching.
This is why Secure Boot issues may appear when working with some private programs, technical utilities, testing drivers, and tools that require low-level access to the system. In such cases, Secure Boot configuration may be needed for the required software to launch correctly.
Important: disabling Secure Boot is not a universal fix for all errors. If a program does not start, first check Windows compatibility, the availability of signed drivers, and the developer’s requirements.
Requirements of Modern Anti-Cheats and Games
With game anti-cheats, the situation may be the opposite. Some protection systems require Secure Boot to be enabled. This is especially common on Windows 11, where TPM, UEFI, and the current security status may also be checked.
Scenario | Secure Boot | What to Consider |
|---|---|---|
Valorant / Riot Vanguard | Often required | On Windows 11, the game may not launch without it enabled |
EA AntiCheat | May be required | Depends on the specific game and Windows version |
Installing an alternative OS | Can sometimes interfere | Temporary disabling may be needed |
Normal Windows use | Better enabled | Improves system boot security |
How to Check the Current Secure Boot Status in Windows
Before changing BIOS parameters, you should check the current Secure Boot status. This can be done without restarting the computer using built-in Windows tools.
Checking via msinfo32 and System Information
Press
Win + R.Enter the command
msinfo32.Press
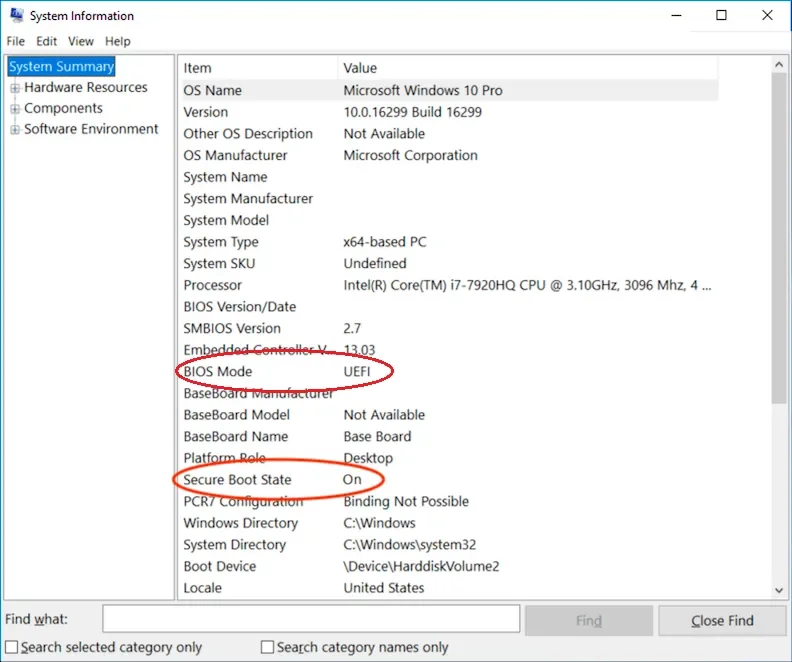
Enter.In the “System Information” window, find the “Secure Boot State” field.
Also check the “BIOS Mode” line.
If the field shows Enabled, the feature is active. If it shows Disabled, Secure Boot is already turned off. If it says “Unsupported,” the system may be running in Legacy mode instead of UEFI.
If Windows is running in Legacy mode, enabling Secure Boot may require converting the disk from MBR to GPT and switching to UEFI mode.
How to Disable Secure Boot in BIOS: Step-by-Step Guide
If you need to understand how to disable Secure Boot in BIOS, first enter the BIOS or UEFI interface. Section names differ depending on the manufacturer, but the logic is almost always the same: open Boot or Security, find Secure Boot, and switch the parameter to Disabled.
Entering the BIOS/UEFI Interface on Different Devices
To enter BIOS, restart the computer and press the required key immediately after powering it on. The most common keys are Delete, F2, F10, F12, or Esc.
ASUS: usually
DeleteorF2.Gigabyte: most often
Delete.MSI: usually
Delete.HP: often
Esc, thenF10.Lenovo: often
F2,Fn + F2, or a separate Novo button.
Some interfaces require switching to Advanced Mode. On ASUS, this is often done with the F7 key. In English BIOS interfaces, you may see commands such as press, select, enter, and save.
ASUS
If you need to figure out how to turn off Secure Boot in ASUS BIOS, follow this order:
During computer startup, press
DeleteorF2.Switch to Advanced Mode if the simplified interface is open.
Open the Boot tab.
Find the Secure Boot section.
Select Secure Boot Control.
Set the parameter to
Disabled.Press
F10and save the settings.
GIGABYTE
To understand how to turn off Secure Boot in Gigabyte BIOS, follow these steps:
Restart the computer and press
Delete.Go to the BIOS Features or Boot section.
Find the Secure Boot item.
If the option is unavailable, disable CSM Support first.
Select
Disabled.Save the parameters via Save & Exit.
MSI
On MSI motherboards, the order is usually as follows:
Press
Deleteduring system startup.Open Settings.
Go to the Security section.
Select Secure Boot.
Change the feature status to
Disabled.Save the settings and restart the device.
Universal Method
If the manufacturer is different, such as HP, Acer, Lenovo, or Dell, use the general algorithm:
Enter BIOS or UEFI.
Find the Boot, Security, Authentication, or System Configuration section.
Find the Secure Boot item.
Select
Disabled.Save the settings with
F10or Save & Exit.
This is how to disable Secure Boot in BIOS if the menu differs from popular ASUS, Gigabyte, or MSI interfaces.
Disabling the Feature in the Boot or Security Section
In most cases, the parameter is located in the Boot or Security section. Sometimes you also need to change OS Type to Other OS or disable CSM. On some motherboards, Secure Boot management becomes available only after restoring or deleting keys.
If you are not sure what a setting does, take a photo of your current BIOS parameters before changing anything. This will help restore a working state if Windows stops booting.
https://www.youtube.com/watch?v=W8WT3QgYx5Y
How to Enable Secure Boot Again
After finishing system configuration, you may need to enable Secure Boot again. This is especially important if you run official games with modern anti-cheats or want to restore the standard Windows protection level.
Required System Preparation: Disabling CSM and Selecting UEFI Mode
Before enabling Secure Boot, check three conditions:
the system must boot in UEFI mode;
CSM must be disabled;
the system disk must use GPT, not MBR.
If you are learning how to disable Secure Boot in UEFI, remember the reverse principle as well: proper enabling requires pure UEFI mode without Legacy boot.
After changing the mode, do not forget to save the parameters. If Windows was previously installed in Legacy mode, simply switching to UEFI may cause a boot error.
Activating Encryption Keys
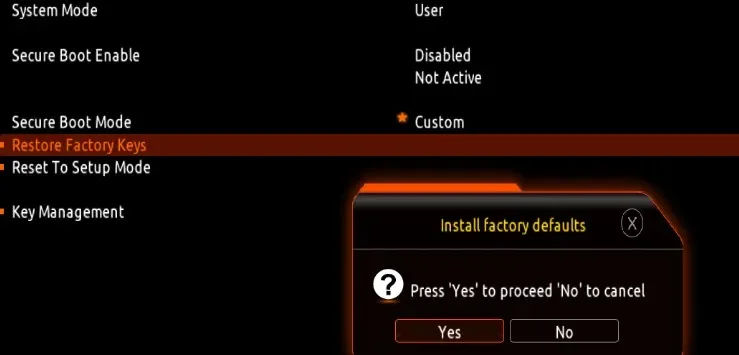
Sometimes the enable option remains greyed out, and the Enabled value cannot be selected. The most common reason is missing Secure Boot keys.
Open the Secure Boot section.
Go to Key Management.
Find Restore Factory Keys.
Confirm restoring the factory keys.
Save the settings and restart the system.
If Secure Boot does not turn on, first check UEFI mode, then CSM, then keys. Usually the issue is found in one of these three places.
Converting a Disk from MBR to GPT Before Changing BIOS Settings
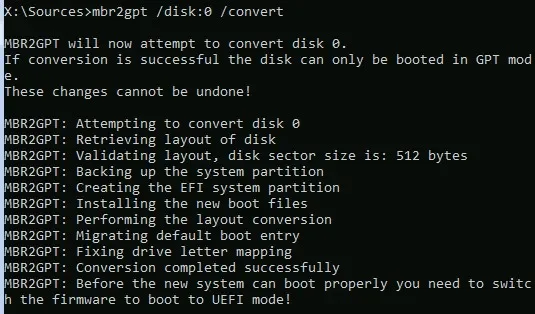
If Windows is installed in Legacy mode and the disk is partitioned as MBR, Secure Boot may be unavailable. Full UEFI operation often requires GPT. Windows includes the built-in mbr2gpt utility, which allows conversion without a clean reinstall.
Using the mbr2gpt Utility
Before starting, back up important files. Although the tool is designed to preserve data, any operation with the system disk requires caution.
Open Command Prompt as administrator.
Run disk validation.
mbr2gpt /validate /allowFullOSIf validation succeeds, start the conversion:
mbr2gpt /convert /allowFullOSAfter completion:
restart the computer;
enter BIOS;
switch the boot mode to UEFI;
disable CSM;
enable Secure Boot if needed.
Common Errors and Issues — FAQ
Secure Boot issues most often appear because of a mismatch between boot mode, disk partition style, and BIOS parameters. Below are the most common situations and ways to fix them.
Black Screen or Constant BIOS Launch
If a black screen appears after changing parameters or the computer constantly opens BIOS instead of Windows, check the boot mode.
Restore the previous UEFI or Legacy mode.
Check the boot order in Boot Priority.
Make sure the system disk is visible in BIOS.
Use Load Optimized Defaults to reset the parameters.
If you changed CSM, try temporarily restoring the previous value.
Most often, this error happens when Windows is installed in Legacy mode and the user abruptly switches the device to UEFI without preparing the disk.
“Secure Boot Can Be Enabled When System in User Mode” Error
This error usually means the system is not in the required Secure Boot user mode or the BIOS does not have the correct keys.
What to do:
Open the Secure Boot section.
Go to Key Management.
Select Restore Factory Keys.
Save the parameters.
Restart the computer.
https://youtu.be/DTaRBysKjjY?si=mJVHQMY2_VgwFrwN
Key Takeaways on Working with Secure Boot
Secure Boot improves Windows security and controls component startup before the system loads. Disable the feature only when it is truly needed: for system configuration, working with certain drivers, restoring boot, or launching compatible technical software.
Before making changes, always check the status via msinfo32, review the Secure Boot state, BIOS mode, and disk partition style. If the system is running in Legacy mode, deal with UEFI and GPT first, and only then change Secure Boot parameters.
To disable it, look for Secure Boot in the Boot, Security, or Authentication sections.
On ASUS, the path is often Boot → Secure Boot.
On Gigabyte, the BIOS Features section is often needed.
On MSI, the path usually goes through Settings → Security.
To enable it again, check UEFI, CSM, and Restore Factory Keys.
If your goal is to run official games with modern anti-cheats, it is often better to keep Secure Boot enabled. If your goal is technical system configuration or compatibility troubleshooting, the feature can be temporarily disabled, but after finishing the work it is better to restore protection.
Save this guide before changing BIOS: it will help you quickly check Secure Boot status, safely adjust the parameters, and return the computer to working condition if errors appear after configuration. ✅